Every Cyrious Control action, order, report, transaction, or activity requires an employee login. For employees to gain access to Cyrious, you must first enter their identifiable information in the Employee Setup. Detailed records of all employees may be saved in the Employee Setup section. This general employee information identifies actions and secures personal information that is unavailable for Users who do not have access granted.

Employees and Employee Groups
To the left of the Employee Setup screen, there is a list of all employees and groups. The Company is the head of this hierarchy. All sub groups, employees, and divisions are beneath the parent company.
A sub group is a group of employees that belong to a specific function in the company such as Administration or Production. Employees are beneath a sub group of the company itself. Alternately, you may set up a collection of employees or sub groups underneath a division, such as a regional collection of employees, or a separate company contained under a parent company.
 | Certain employees and groups are set up as defaults. You cannot delete these, even if not in use. The defaults are Company, House Account, and System Administrator. |

Employee Sub Group Screen
<  |
Click an employee sub group at far left. || 
- Group Name Enter the name of the group. This option must be completed – a warning will appear when you try to save the information.
- Active If this box is checked, the group is active.
- Print As Enter the group name you want printed on documents generated by Control.
- Group Code Enter in your coding for marketing and reports.
- Manager Enter in the name of the head of this group.
- Default Pricing Plan Select the default pricing for this group.
- Default Tax Class Select the default tax class for this group. You can select from city, county and state tax classes.
||  || There are numerous options throughout Control to adjust the tax class used in place of the default. ||
- Street Address Enter in the group's address. For example, your Sales group may be located in Orlando, whereas your Administrative group is in Miami.
Specifying a Telephone Type
The following information applies to many information screens in Control.
- Options List To the left of each telephone field is an arrow. Selecting this arrow reveals a list of telephone types from which to choose.

- Office Phone Enter the number of the office phone for the selected street address. This may be different from the Company phone number(s). Click the button to the right of the entry field to enter a more complex telephone number, such as an international calling code. Press Enter to apply the new number.


- Office Fax Enter the number of the office fax for the selected street address. This may be different from the Company phone number(s).
- Not Specified This may be a second office phone number or it could be a cell phone. You must select the option from the drop-down list once you have entered a number.
- Email Address Enter the complete email address for that sub group or individual.

- Home Screen Select the option from the drop-down list.

- Quick Products Designate the Quick Products you want members of this group to see when they initially log in to Control. For example, your Sales team might need quick access to new orders, but Repairs might need access to service tickets.

Notes Enter any additional information about the sub group as required. These notes are visible only to those authorized to access the Employee Setup.
SPECIAL ACTION TOOLBAR FUNCTIONS
The options available in the Action Menu will change depending on the screen you are working in. See example below.

- Close Closes an unedited screen.
- New Employee Sub Group Opens a dialog window with prompts to create a new employee sub group. Employee sub groups branch out from the main company group displayed at top.
- New Employee Opens a dialog window with prompts to create a new employee. Highlight an employee sub group and then click this button. The employee will be under that sub group. Nothing is highlighted when you click this button, the employee will be under the parent company.
- New Opens a screen to create a new record.
- Edit Enters a mode that allows previously saved information to be changed.
- Clone Creates a duplicate of the selected record or option.
Example: There are fewer options available for the Options Setup Screen.

Right Click Options
For quick access to certain functions when editing a record, simply place the cursor over the options and then click on the right mouse button.
A pop-up menu will appear with all of the options available for that selection.


This allows access to options that do not appear on the current screen.
|| || The best way to learn what options are available on the Right Click menu is to open a few screens and look at some of the menus. ||
Employee Sub Screen
New Employee Sub Group
This option opens a dialog window with prompts to create a new employee sub group. Employee sub groups branch out from the main company group displayed at top.

- New Employee Opens a dialog window with prompts to create a new employee. Highlight an employee sub group such as Admin or Sales and then click this button. The employee will be listed under that sub group.
- Delete Removes an employee from the list.
- Show Inactive If this box is checked, all employees and sub groups will show.
- Group Name The name of the group.
- Active If this box is checked, the group is active.
- Print As Enter the group name you want printed on documents generated by Control.
- Group Code Enter in your coding for marketing and reports.
- Manager Enter in the name of the head of this group.
- Default Pricing Plan Select the default pricing for this group.
- Default Tax Class Select the default tax class for this group. You can select from city, county and state tax classes.
- Division Name Use divisions for special distinctions such as regional groupings, or place separate companies under a single parent company. If youset this group as a division, this field is mandatory.
- Address Enter in the group's address. For example, your Sales group may be located in Orlando, whereas your Administrative group is in Miami.
- Quick Products Designate the Quick Products you want members of this group to see when they initially log in to Control. For example, Salespersons might need quick access to new orders, but Repairs might need access to service tickets.
- Notes Other specific information about the sub group. These notes are visible only to persons authorized to access the Employee Setup.
SPECIAL ACTION TOOLBAR FUNCTIONS
 | Edit | Enters a mode that allows previously saved information to be changed. | |||
 | Save | Saves the current employee information and closes the record. | |||
 | Cancel | Cancels the action and exits the record. A prompt will ask you to confirm that you wish to exit the record without saving the information. | |||
 | Delete | Deletes the current Employee from the database. This step cannot be undone. If the employee has been assigned to certain tasks/items, these must be reassigned to another employee before you can delete. | |||
 | Clone | Creates an exact duplicate of the current record and creates a New Employee listing in the group selected. If you wish to list this employee in another Group, enter the new employee information, and select the Group Name before you save the record. | |||
 | Prints the selected order, estimate, company, etc. Expands to choose what exactly you want to print, Employee Activity Report, Employee Customer Listing, and Employee Info. | ||||
 | Status | Allows the selected employee's status to be changed. | |||
 | Activities | Expands to create an email, note, call, appointment, meeting, to do, or work assignment. | |||
 | New | Opens a screen to create a new record. | |||
 | Close | Closes an unedited screen. |
Print Sub Menu

Expands to choose what exactly you want to print, Employee Activity Report, Employee Customer Listing, and Employee Info.
Activities Sub Menu

Expands to create an email, note, call, appointment, meeting, to do, or work assignment.
Employee Information Tab
The top portion of this screen is for the employee's business information. Complete as many or as few fields as needed.
|| || You must enter a name in order to save the employee's information. || Use of System

Designates which areas of the system this employee is permitted access.
- Active Employee – To have an employee appear throughout Control, check the Active Employee box. Former employees are inactive and do not appear in other portions of the software, but you will retain their information in this section.
- Salesperson – Check this box to assign salesperson status.
- Show on Time Clock – You must check this box to designate an hourly employee.
|| || Employees cannot clock in or out unless this box is checked. ||
- Create Calendar – Check this box to have the Schedule tab activated for the employee.
- Show on Line Items – Check this box to allow an assign an employee to a line item in a multi-line order for a single company.
Current Status

- Regular Employee – Designates an employee whose employment is current and permanent. Until you enter a termination date for this employee, they will be able to clock in and out.
- Contract Employee – Designates an employee whose employment is current and for a pre-determined period. They will be able to clock in and out until the date specified in the Termination Date box.
- On Leave – Designates an employee whose employment is current, but the employee is not actually working. Employees marked as On Leave will not be able to clock in or out until you change their status to Regular Employee or Contract Employee.
- Prior Employee – Designates a past employee. Employees marked as Prior Employees will not be able to clock in or out.
- Hire Date – Must be entered for regular and contract employees in order to clock in and out.
- Termination Date – Must enter for prior employees.
Pricing Options
This is where you will specify their commission rate plan. Control computes commission for your employees automatically.
Entering Security Information

From the main employee screen, click the Add User button in the lower right hand corner of the screen to open an entry screen.
Specify the employee's desired login name.
Enter a password.
Verify the password.
Select the template you wish to make available to the employee, e.g. your Payroll Accountant might need to have access to the Accounts Payable template.
Personal Information Tab
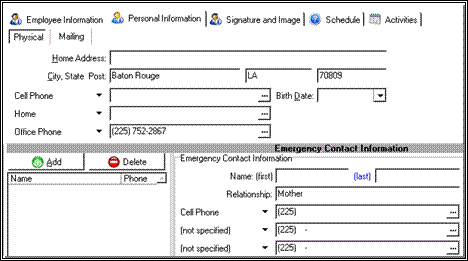
- Physical Address. In the area below, fill in the employee's physical home address and any personal phone numbers you may have for this employee. This may be necessary in case of an emergency and you need to locate family members.
- Mailing Address. If your company does not hand out pay stubs or pay checks, and you mail them instead, you will definitely need to enter in a mailing address here. This record will also come in handy when you need to mail out other information regarding health insurance, 401k benefits, etc.
- Birth Date. Some employers may be wary about storing this sensitive information in an area potentially viewable by many employees. However, storing the employee's date of birth here may be useful in case of an emergency. You may need to access this information for medical reasons. It is also a nice way to remember when to buy your employees cake and ice cream!
- Emergency Contacts.
Click Add to open a new emergency contact record
Enter the emergency contact's name, their relationship to the employee, and preferably at least one phone number for the contact
Keep clicking Add to enter in as many emergency contact records as needed for that employee
Click Save when completed
The Delete button disposes of an emergency contact record.
Right Click Options

- Export Grid – Creates a file that you can export to another program such as Microsoft Excel.
- Column Chooser – Opens a pop up box with a check list of columns you can view in this box. Cyrious saves all your settings for each screen you customize.

Signature and Image Tab

Signature
Designates a signature that will show up at the bottom of any documents the employee prints from Control. This may include letters to a customer, invoices, etc.
Open Picture – Opens an Explorer window to search for an image on your computer.
Clear Picture – Clears the currently selected image.
Paste Picture – Pastes an image that saves to your clipboard.
Image
Designates an image to store in the system that other employees can view. This may be helpful if you are part of a rather large corporation and you have employees from different parts of the country or world that otherwise would not be able to put a face to the name.
The commands are the same as for the signature upload.
Schedule Tab

Available jobs are in the large box.
||  || Set up the list of jobs.
Main Menu | Setup | Pricing Setup | Parts Setup || Select the box to the left of a job to assign the employee to it
Click the box again to remove the employee from the assignment
|| || An employee not scheduled for a job in this setup tab will not be able to charge time to it in the Time Clock. || Activities Tab

The Activities tab is a tool to help you track your employees' activities.
Unlike using the Activity Manager for viewing employee actions, this section will allow you to view and schedule more than contact activities, including:
- Close outs
- Credit card processes
Edit – Enters a mode that allows previously saved information to be changed.
* Open in New Window – Opens the highlighted record in a new window.
* Complete Activity – Expands and displays options for marking the activity as completed.
* Change Scheduled Date – Opens a pop up window with a dialog where you can change the date of the activity.
* New Activity – Expands to create an email, note, call, appointment, meeting, to do, or work assignment.
* Print – Prints the selected order, estimate, company, etc.
* Clone – Copies a pre-existing order, estimate, or product to a new record.
* Delete – Removes an estimate or product from the database.
* Company – Expands with a few options for viewing the company and displaying reports pertinent to the company.
* Export Grid – Creates a file that you can export to another program such as Microsoft Excel.
* Column Chooser – Opens a pop up box with a checklist of columns you can view in this box. Cyrious saves all your settings for each screen you customize.
Time Clock
Employees can access the time clock from the top row of Action buttons from anywhere in Control. The only employees who will appear are those checked in the Show on Time Clock box in the Employee Setup screen.

Special Actions Toolbar Functions

* Close – Closes an unedited screen.
* Clock Out – Clocks the highlighted employee out for the day.
* Set Status – Opens a sub menu to change the status of an employee.
* Special Action Menu Functions
* Edit – Enters a mode that allows previously saved information to be changed.
* Save – Saves all entered information.
* Clock Out – Clocks the highlighted employee out for the day.
* Cancel – Disregards changes and additions made to a record.
* Clone – Copies a pre-existing order, estimate, or product to a new record.
* Close – Closes an unedited screen.
Right Click Options

* Open – Open a record.
* Print – Prints the selected order, estimate, company, etc.
* Status - Shows the employee's current status.
* Clock Out – Clocks the highlighted employee out for the day.
* Set Status – Opens a sub menu to change the status of an employee.
* View Work History – Shows a list of projects that employee has worked on.
* Use Material – Designate which materials that employee can use.
* Set as Inactive – Sets the designated employee as inactive. This does not delete their record out of the system.
* Export Grid – Creates a file that you can export to another program such as Microsoft Excel.
* Column Chooser – Opens a pop up box with a checklist of columns you can view in this box. Cyrious saves all your settings for each screen you customize.
Clocking In and Out
Highlight the employee's name
Click the Clock In button to begin that employee's time for the day
Click on Clock Out when their shift is over
You can specify whether or not employees should use passwords for clocking in and out, and for changing time clock statuses as well, in the System Setup under Time Clock Options.
Setting Status

After clocking in, you can expand the Set Status menu to specify where to bill the employee's time. Use these statuses to specify how to charge an employee's time. These statuses are customizable and can even be specific to the projects your company is currently working on.
Employees can select options such as Lunch or Smoke Breaks, or any other unpaid status designated by your company, as well as clocking in on certain orders (more on this below).
Once the employee sets his/her status, time will be billed to that area until another status is set or the employee clocks out, whichever comes first.
Clocking On and Off Particular Jobs
Select a status that relates to a work activity, such as Production or Maintenance
Assign an order or estimate to that job in the pop up window
* Order – Enter a specific order number. If you do not know it, you can click on the magnifying glass to search for the order in Explorer.
* Estimate – Enter a specific estimate number. If you do not know it, you can click on the magnifying glass to search for the estimate in Explorer.
* Company – Expands with a few options for viewing the company and displaying reports pertinent to the company.
|||| If you do not produce an exact match in this box, Control will not automatically bill time to that company. || * Contact – This option is available after you have entered a company name. Enter the contact name to which you are billing time. You have the option of using the selection list to search for it.
* Part – Enter the part name to which you want time to be billed. If you do not know exactly how the record is entered in Control, you have the option of using the selection list to search for it.
* Notes – Other specific information about the sub group. These notes are visible only to persons authorized to access the Employee Setup.
|| || Some customers will require a detailed breakdown, so it is a good habit to get into using this feature for all projects. || * Password – The employee scheduling time to a project is required to enter in their password for verification after they have completed all information fields.
Time Clock Adjustments

|||| An employee has to have previously clocked in to activate this selection. || * Select the appropriate day from the calendar
* Choose the desired employee from the drop-down box directly below the calendar
* Click the Edit button to activate the screen for changes
* Use the time and date fields in the center of the screen to complete your changes
* Select the Time Card is Closed box to enter in an end time
* Select Save to complete your changes
|||| You must make sure that when adjusting times you refrain from overlapping the time that a person is clocked in or out, to the second. If adjustments are incorrect, an employee may be compensated incorrectly. || Special Actions Toolbar Functions 
- * Close – Closes an unedited screen.
- * Edit – Enters a mode that allows previously saved information to be changed.
- * Delete – Removes an estimate or product from the database.
- * New Master Timecard – Opens a new master timecard.
- * New Detail Timecard – Opens a new detailed timecard.
Creating New Time Cards
- * Open the Time Clock Adjustment Screen
- * Select the New Master Time Card button
- * Alternatively, to create a time card that will show status descriptions:
- * Open the Time Clock Adjustment screen
- * Select the New Detail Time Card button * * Database back-ups * * Emails sent from Control * * Estimates created/converted * * Databases imported * * Log ins/outs * * Modifiers created * * Notes created * * Orders created * * Parts used * * Payments ran * * Products created * * Reports printed * * Service tickets created You can select which activities to view for that employee by selecting check boxes in the top query window. The green check button selects all activities. The red circle button clears all check boxes. You can specify which activities you want to view by checking the desired boxes. If you are looking at contact activities, a detailed screen with the company's contact information will appear on the right side of the screen, including the related order number, the date of the contact, and any notes the employee made after making the contact. This screen also displays future activities scheduled for the employee. Right Click Options
 **
**