One of the frequent requests from businesses is “How do I get the SSLIP to start up automatically without having to log in?”
The SSLIP was not designed to run without a user logged in. However, it is possible to do so (with later versions of Windows) using Microsoft's built in program, Task Scheduler. This technique has some drawbacks, including:
- It is not officially supported by Cyrious. If it doesn't work, technical support won't spend long trying to get it to work.
- Since there is no visible screen, there is no way to log into the SSLIP to do things you might do there (like reset sessions).
- If there is a problem with the SSLIP, the only recourse is to kill it in task manager.
- If you kill it in task manager, you will have to start it manually.
That being said, for some users it might be a welcome approach, so here are the details.
Concept
The approach is to use Microsoft Task Scheduler to start the SSLIP right after reboot, without requiring anyone to log in first. When you set up the task, you'll have to put in the users name and password to use to run the program. That users MUST be an administrative user to ensure that the C3S service runs properly. If you are on a domain, it should have domain admin rights. If you are not on a domain, the user just need administrative rights on the server.
Steps
Step 1 - Run Task Scheduler
How to start Task Scheduler depends on the version of Windows you are running. In most versions, click on the Start button (or press the Windows key) and then just start typing Schedule. You should see Scheduled Tasks or Task Scheduler in the list of choices. Run this.

The Task Scheduler will open and show a few things already set up to run automatically.
Step 2 - Creating a New a Task
Create a new task by clicking on Action and Create Task.
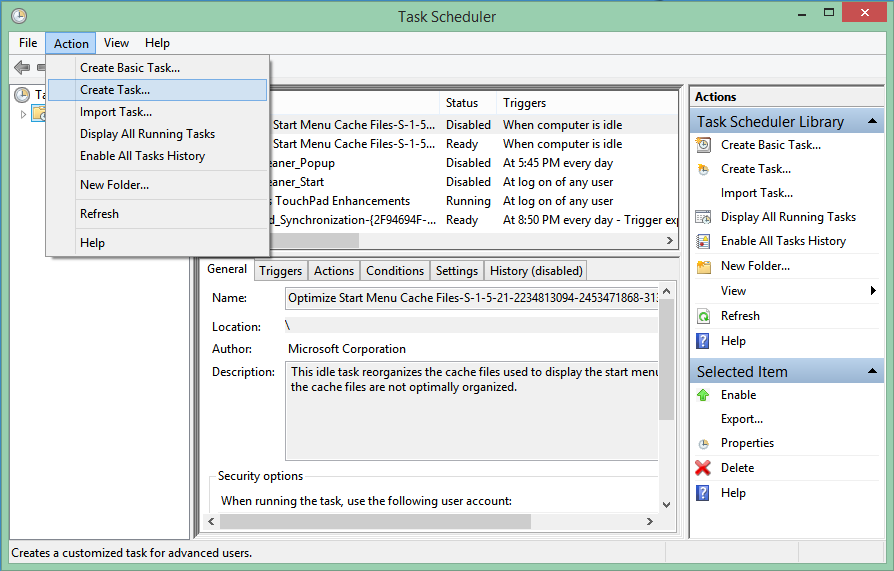
This will open the Create Task dialogue.
Step 3 - Setting the General Tab Properties
The first tab on the Create Task dialogue is the General tab.

On this tab, you will need to set these properties:
- Name: Set this to “Run SSLIP” or similar
- Check the User Account: This will default to the logged in users, but it must be set to a user that is an administrator. This should be a domain administrator for users on a domain, or a server administrator for workgroup users.
- Select Run whether user is logged on or not.
- Uncheck Do not store password.
- Check Run with highest privileges
- Set Configure for: to your current operating system.
Next, click on the Trigger tab.
Step 4 - Setting the Trigger Tab Properties
Add a new trigger by clicking on the New… button.

This will open the Edit Trigger dialogue.

On this tab, set the following properties:
- Set the Begin the task property to At Startup.
- Set the *Delay task for: property to 1 minute. This is to allow time for the CHAPI service to startup before running the SSLIP. * Uncheck all other boxes except Enabled. Then click OK to add this trigger and click on the Actions Tab to continue. ==Step 5 - Setting the Actions Tab== Add a new action by clicking on the New… button.

- This will open the New Action dialogue.
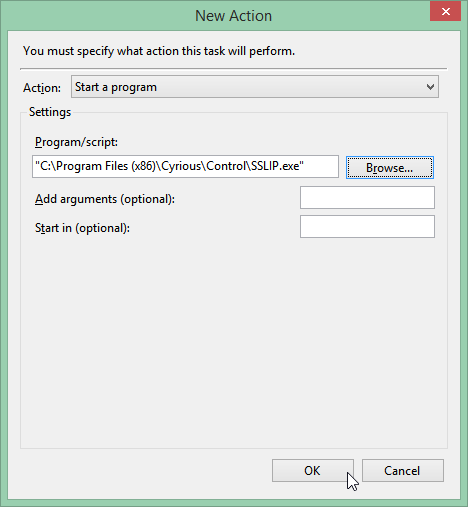
On this tab, set the following properties: * Set the Action to Start a program * Browse and select the SSLIP executable as the Program. This is normally either <html><div style=“margin-left: 40px;”> C:\Program Files (x86)\Cyrious\Control\SSLIP.exe (for 64 bit operating systems) or </div></html> <html><div style=“margin-left: 40px;”> C:\Program Files\Cyrious\Control\SSLIP.exe (for 32 bit operating systems) </div></html> Then click OK to add this action and click on the Conditions tab to continue.
Step 6
Conditions Tab

On the conditions tab, uncheck all boxes that are enabled. (The grayed checkboxes are disabled. They can be ignored.) Then click on the Settings Tab to continue.
Step 7
Settings Tab
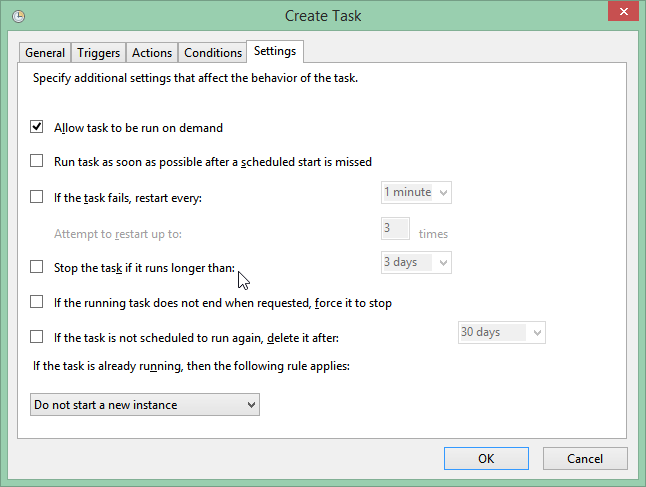
On the conditions tab: * Uncheck all boxes that are enabled except the Allow task to be run on demand. * Choose Do not start a new instance if the task is already running. Click OK to create scheduled task.
Step 8 - Enter User and Password
When you save the scheduled task, it will prompt you for the password of the user selected to run the task. (You selected this on the General tab.)

Enter the password of the administrative user you selected and click OK**.
Step 9 - Confirm
You should now see the Run SSLIP scheduled task in your Task Scheduler.

To test the task:
- Reboot the computer. (Make sure Control is closed for all users first!)
- Wait 2 minutes at the login screen.
- Log in and try to run Control , or have a user run Control from another computer.
Notes
- You will not see the SSLIP on the first tab of Task Manager in Windows 8+. You will see the SSLIP on the details tab, however.
- The SSLIP runs in the console. According to some blogs, it may be possible to connect an RDP session in console mode as that user and see the session, but this has not been tested.
Source
Contributor: Cyrious Software
Date: 5/2016
Version: Control 5+